
After several weeks of struggling to find a balance in the face of shelter-in-place orders that require me to work remotely while homeschooling my son, I’ve finally started making the proverbial “lemonade” out of the situation and am resuming some research into the lumen printing process. I’ve long been a fan of this introductory alternative process ever since learning about it in graduate school, but since my first serious attempts at creating with the process, I’ve been bothered by the lack of resources that clearly define some of the variables that shape this process.
As I write that sentence, I know how much it sounds like I want to attempt to demystify some of the more serendipitous elements of this process, and by doing so, I threaten the heart of what makes this process so appealing, right? After all, lumens simply require photo paper, a picture frame, some botanicals, and fixer (although this last ingredient isn’t necessarily required) – it creates amazing colors and wild, uncontrollable shapes when exposed to UV light, heat and humidity. A process whose beauty is defined by wabi sabi, why would you want to change that by clearly the hows and whys?
Because, as an instructor, if I can introduce students to a new process as successfully as possible the first time they experience it, they see the magic that fuels the hard work it’ll take to make that basic photogram into an amazing piece of artwork. The truth is that when using expired supplies like old photo paper, some results that lumens create are far from desirable. Some papers require extremely long exposures, while others produce unappealing colors. Fixing can ruin some prints while vastly improving others. There’s sites out there that provide a virtual laundry list of variables that impact the lumen print – but only in the most vague terms. Side-by-side examples showing exposure shifts, humidity alterations, various brands of paper with the same subject? Well, they don’t seem to exist.
So what do you do if you want your students to be successful with a new process like this early on while also encouraging them to explore further? It’s easy enough to provide a single paper in a workshop that you know will work, but students are bound to only purchase that particular paper and use it exactly how you used it in class, especially if they’re aware of the variables. But what if you show up with dozens of examples of a variety of papers, exposure times, humidities and variables to show them the true scope of the process? What if you go further than that and create a community resource that collects this data from photographers and educators, worldwide, so that students can search and purchase the paper that has the look they have in mind for this project?
Are you eliminating the magic? I don’t think so. You’re controlling the magic and harnessing the power of data. Rather than sticking a random assortment of ingredients from your kitchen in a stew pot, you now know which allow you to create a marinara sauce, yet still rely on your ingenuity to improve on it every time you make it by shifting those variables around.
I’ve been part of UAF’s eCampus Chancellor’s Innovation in Technology & E-Learning Program for the last year and have been working with their designers to create such an online resource that will be open to the public. Over the summer, I hope that we can reveal it and have the lumen community start contributing to a resource that will provide broad recipes that inspire collaboration, data collection and sharing, and innovation. Until then, I’m working on building up a catalog of fixed and unfixed imagery on a wide range of paper while also trying to remain creative in my approach. I’ll be sharing my results here – including some of my attempts at data collection before that will provide a baseline for this database. I’ll also be providing routine updates online – so be sure to follow me there!
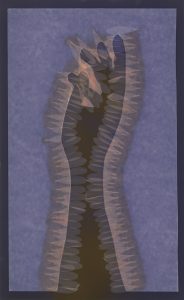
Very nice lumen print. Forte Salon has an interesting color palette when unfixed and when fixed. I like the unfixed palette of blue to dark navy blue backgrounds or negative space of the print. Subjects containing moisture produce shades of burgundy and pink. Fixed lumens have shades of brown and tan. One of the reasons I enjoy working with Forte Salon and a hand full of other paper types is the wonderful aspect of these papers to produce a halo surrounding a subject with moisture content. Moisture will wick out as it migrates out onto the paper area away from the subject. These wet area tones will be distinctly different than dry areas further away from the subject. This paper was less successful in producing multiple halos. This is a technique I discovered by accident and now I use this property of the paper at will. One day I arranged a lumen composition a couple of hours before first daylight and just let the print sit in my darkroom with the lights turned off. The sun rose quickly toward its zenith that summer day. So I place the print out to expose after I was sure the side of the print tray would not cast a shadow onto my print. Around eleven am a strong thunder storm was approaching. I moved the print back to the darkroom to wait out the storm. After about two hours the storm passed and the print was placed out to finishing the exposure. After just a few minutes I noticed the print had two concentric halos. I stayed with the print because I did not want to risk losing the double halo. After about two hours I noticed the two halos were starting to merge into the shade of tones. The print was returned to the darkroom to examine. The cover glass was removed and I noticed there were just a couple areas of the print were still pure white with no color density. I found this distracting, so I used an old familiar darkroom technique of covering the print with opaque cards and I custom made a card with a hole would be appropriate to burn in the white tones with no detail. I burned in these areas using direct sunlight for about ten seconds. These slightly fogged areas now matched my artistic vision of how they should look. A slight tonal detail but not distracting highlight. Again I like your lumen print and your idea of having an open resource on lumen printing. Regards, John Fobes