Almost a decade ago, my father and I spent some time creating what, at the time, was a massive upgrade for my home darkroom and my nascent interest in alternative process. I was chest-deep into the MFA program at Academy of Art University and had been relying pretty heavily on a jury-rigged contraption that consisted of two party-style blacklight bulbs in a locking Rubbermaid container. My original exposure unit, well, “worked”, although my understanding of what appropriate exposure looked like at the time was pretty far off. I was just happy to get any result.
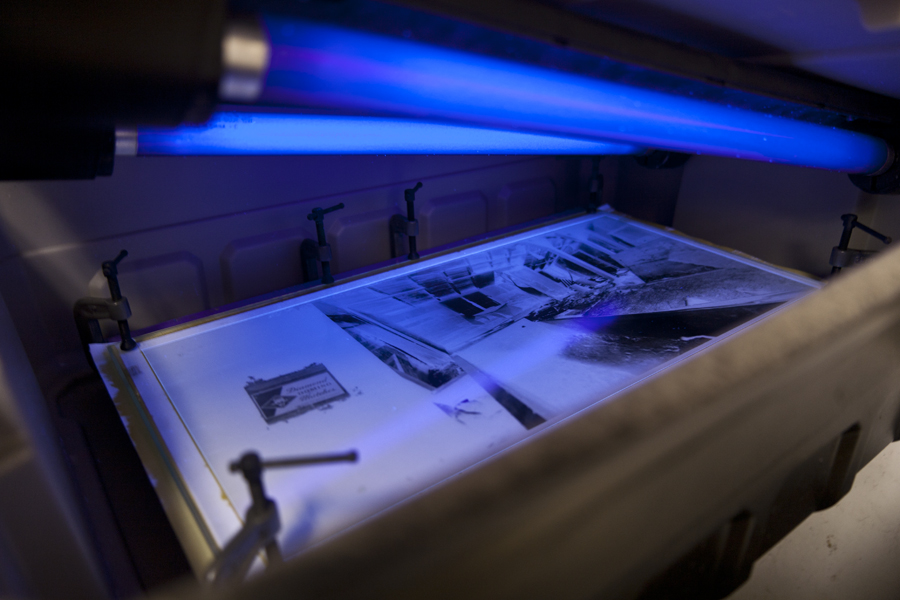
Being on a shoestring budget during my graduate studies, I tried to make this box as inexpensively as possible. I neither knew that I’d be sticking with alt-pro nor that I would be teaching it at the college level in just a couple years, so I cut corners everywhere I could. Note that the contact printing mechanism isn’t an expensive leaf-backed frame but is two pieces of glass held together with C-clamps. The C-clamps would go on to shatter several pieces of glass, causing additional expense before I wised up and bought a proper printing frame.
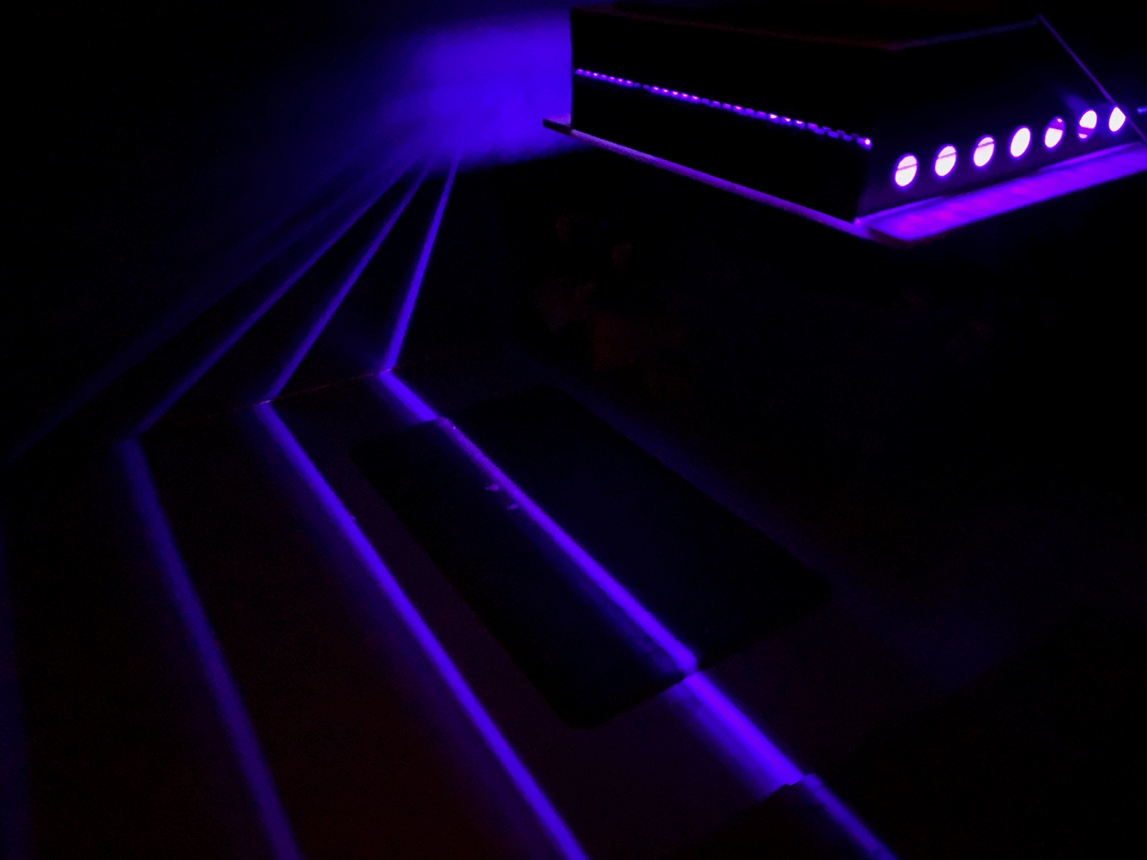
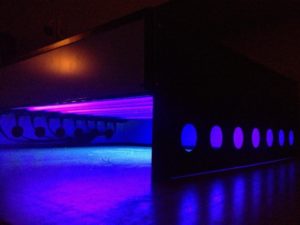
My second exposure unit, the one that I built with my father, was heavily inspired by a professional model I was lucky enough to procure via grant for my department at the university. While I wasn’t willing to shell out the $1000 (plus shipping) for a professionally made 24×28” exposure box at home, I was willing to come up with a budget-minded clone. I replaced the impressive wooden shell with a sheet metal exterior, made locally for $100 at Wilber Bros., and replaced the traditional UV bulbs and a mess of complicated wiring, ballasts, fans, etc, with 10 UV Party-style Blacklight bulbs from Wal-mart. The construction cost was a quarter of the professionally-made box without shipping.
This was a huge improvement and, coupled with the purchase of a 20×24” contact printing frame (which cost more than my homemade exposure box!), this clone served me well for eight years. This truly provided opportunities to print professionally at home, greatly alleviating stress during my graduate studies which would regularly send me into the university darkrooms to complete assignments. I was grateful for the help from my father, as this box served me very well for the last eight years.
There was, however, some issues with it – albeit small ones, these did add up.
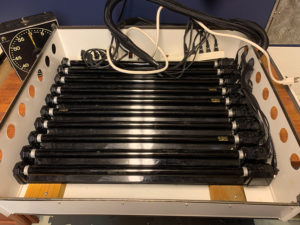
The fans in the original design served a substantial purpose – cooling down the bank of 10 florescent bulbs. The box we made used factory-made bulb enclosures which would loosen and stretch in the presence of heat just enough to pop the bulbs out of their sockets. While none of the bulbs actually broke, there were several prints that were ruined due to a bulb turning off or falling on top of the contact printing frame during exposure.
Solution? A clip-on fan attached to the opening to drive cool air over the bulbs. Inelegant, but simple.
The box was a fraction of an inch too small to simply attach the lights – the AC plug socket for each of them had to be popped out of its socket and placed at a 45 degree angle, using some electrical tape to hold it in place. Not the safest arrangement, but it worked.
And, possibly the most important shortfall wasn’t revealed until the Fall of 2013.
I was lucky enough to convince the photo department at AAU that I needed an outside mentor to formally teach me Van Dyke Brown after several semesters of running into walls trying to self-instruct. Certainly, AAU’s amazing faculty did everything they could, but I had started asking questions that few faculty there knew how to answer because I was digging deeper and deeper into alternative process. I decided to ask Christina Z. Anderson to mentor me for a semester and figure out what was wrong with my workflow and how I could eek out more quality out of my images.
In short, everything was wrong. I’m joking — but only slightly.
Chris was reasonably critical of my entire workflow and the resulting prints from day one. She retaught me alternative process from the ground up, considering elements I had never considered and solving multiple seemingly insurmountable hurdles along the way. I learned about hot versus cold press watercolor papers, appropriate humidity for coating papers, coating methods, exposure test strips via 31-step wedges, curve creation via Mark Nelson’s Precision Digital Negative method, appropriate processing techniques, as well as a variety of other tips and tricks that I still use and teach to my students. It was an absolute bear of a semester, but we got through it — and I’m certain I only learned a small fraction of 1% of what Chris could teach me.
Nonetheless, what that time with Chris did reveal was that my budget-minded approach to UV printing was costing me a lot of time in the darkroom. It’s no secret that UV Party Blacklight Bulbs don’t output the same wavelength or intensity of light that a standard white UV bulb does, but installing the appropriate bulbs would have cost me much more and required electrical skills I didn’t have. After revising my entire workflow and using Mark Nelson’s method to create digital negatives, my Van Dyke Brown prints were coming out of the printer after a lengthy 18-25 minute exposure. Cyanotypes were stuck at similar exposures of 25 minutes per print. Hours were needed just to get a couple negatives printed – and it’s been that way since 2013. Given the lengthy exposure times and my utter reliance on such a system at these latitudes, I was pretty burnt out with my home darkroom after graduation in 2014 and the exhibitions that followed in 2015-2017. After my solo exhibitions of Stories Fading Fast, I almost nearly stopped printing at home altogether. I looked at replacing the lights over the years, but the expertise needed and cost were always sufficient deterrents.
This semester, however, I had a student let me know that they had recently constructed a UV LED light box at home using some suggested lights easily procured from Amazon. While I had watched prices of LED replacements in years past, they still had been price-prohibitive up until just recently. The student provided me a link to some Barrina UV LED Blacklights that cost just shy of $40 for 4 lights – beating out the original cost per light for the UV Party Bulbs I had initially installed. A couple weeks ago, I ordered two sets and patiently waited for the semester to end so that I had some time to tackle this art project.
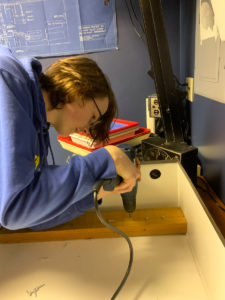
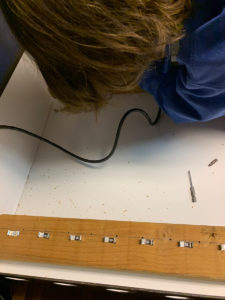
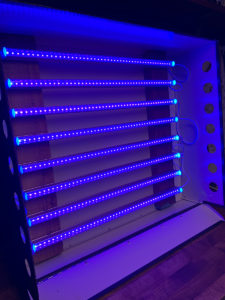
Inspired by the collaborative project that built this exposure box initially, I asked my son to help me upgrade the box with me. The new lights are all easily installed through quick release fixtures that snap the lights into place. As well, all the lights are daisy-chained together, allowing for a single plug to control all of the lights (rather than the 10 individual plugs controlled by two power strips that I had before). An additional perk is that the plug isn’t grounded, allowing me to use my GraLab to time exposures accurately (in past, I’d have a stopwatch going that would act as a virtual leash, keeping me in or near the darkroom for those lengthy 25-minute exposures). The LED lights also don’t require a clip fan to cool them down, cutting down on the bulkiness of the entire unit.
Perhaps most exciting is that the new lights cut down Cyanotype exposures by more than half their original time! More testing is required over this lengthy winter break to determine new curves and exposure times for multiple processes, but I’d guess I’ll be looking at a Van Dyke Brown exposure that’s less than 10 minutes. I already have a variety of ideas running through my head for new projects and prints for the new year!
+There are no comments
Add yours